Monday 5 December 2011

Image lab 5- Large Format

In this image lab me and the group I was in, researched online to find a concept for our still life photo. A member of my group suggested we recreated a renaissance painting. We wanted to recreate the 'Vanitas' painting by Bruyn, Barthel the Elder but using objects from our day. I then suggested if we were going to use a skull and recreate this painting, we could use objects which make us feel human. The skull which we were able to get hold of was black and we agreed this was a good thing- because it's not the original colour (or even real), that could represent that fact that in this day and age there isn't a lotof stuff that's natural about us these days. 


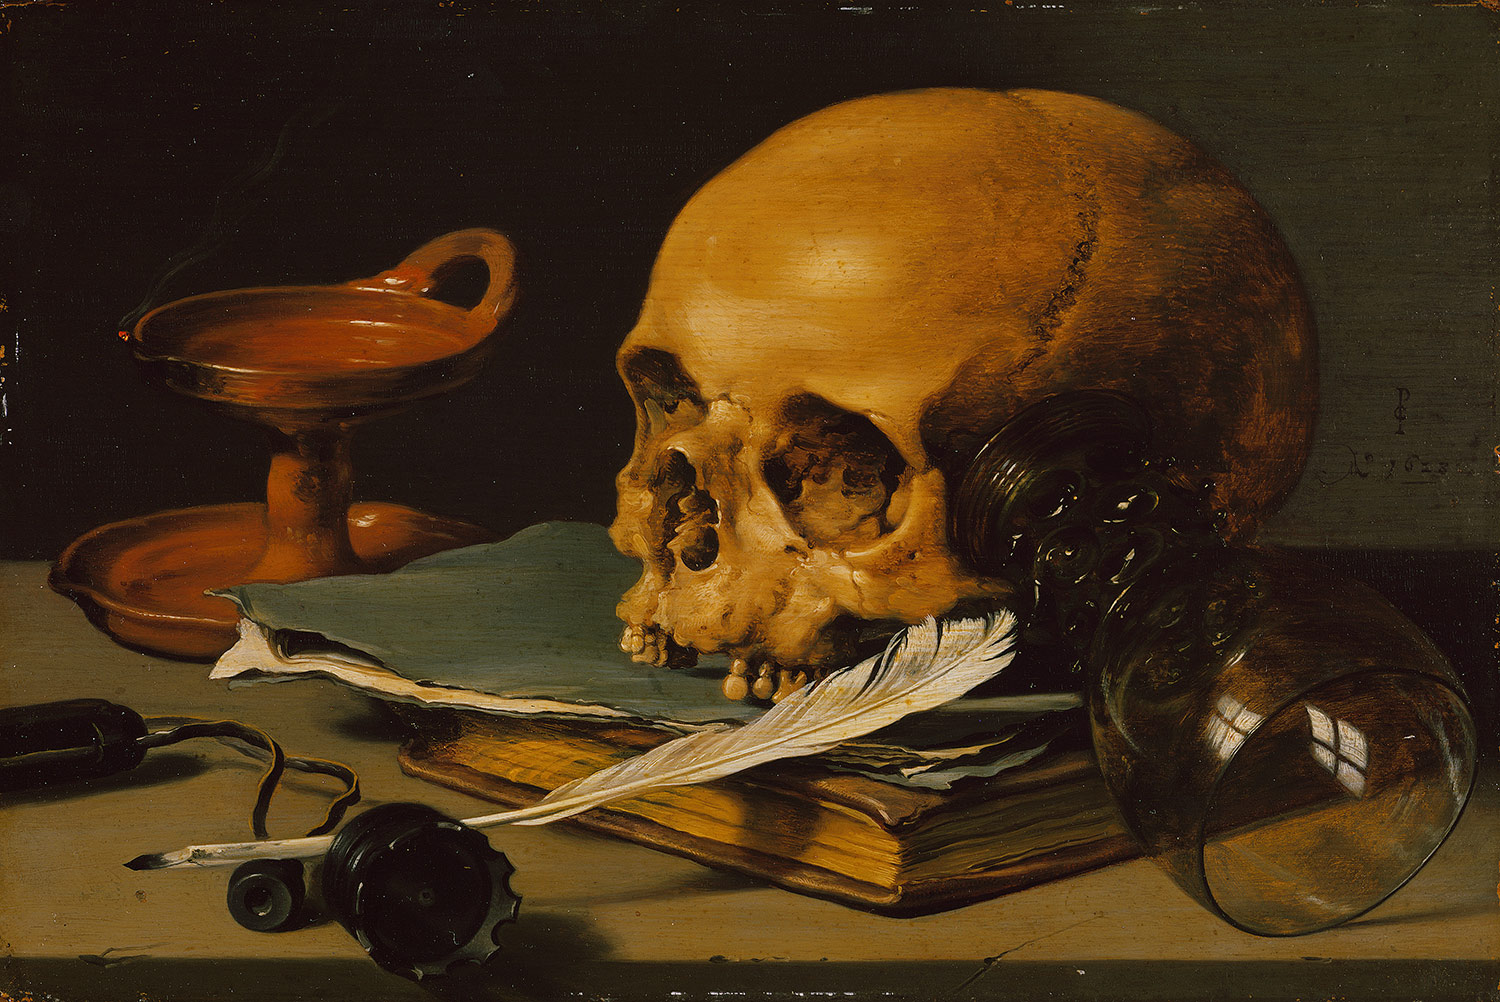
In this painting there seems to be quite random objects and some of them even religious and to me it links to the skull being human and all these different things that fill our lives and make us who we are.


On week 10 we all brought in objects with our own significance. This week we learnt how to set up the large format camera on the tripod or studio stand. We also learnt about the lighting and flash set-up with Peter and then how to process and scan in the negative on the Hasselblad scanner. With these scanners we can get an amazing quality, very large image. 
So because there was so much to take in this week, my group and I weren't able to get a photo taken of our still life.
In week 11 we knew the process and were able to complete our still life image, get it processed and scanned in. I then edited the image of Photoshop to rid the image of any blemishes.
(Below is our final image)


Overall, I'm very happy with the outcome. Though the skull was supposed to be the central focus, it was a very good first attempt and the concept works very well.

Image lab 4- Time and The Image

I was shown a programme from a BBC 4 series where three photographers were each given a different form of digital camera where they went off and took images using the latest form of digital at the time. 


I went on to do some research into using different digital forms and I came across this online article, where Katherine Rose tested the iPhone 4S camera with the Canon 5D mkii. http://www.guardian.co.uk/technology/gallery/2011/dec/04/photography-iphone-v-professional-camera#/?picture=382744493&index=0
I also looked at Aperture issue 158 photography and time. In this magazine I really liked the work of Stephen Ayling (Westminster), Edward Fox (Elm in Summer and Winter). I also liked Paul Caponigro's, Stonehenge, where he said "the effect is to silence one with wonder". 
 
I looked at the way a historic building could be static whilst everything around it is going under considderable changes. So I researched the work of some photographers who worked with time and the image. I read through a book I ordered by Charlotte Cotton titled, 'The Photograph as Contemporary Art'. In this book I found a photograph taken by John Riddy. In the photo he tried to show history (the old building) and the present (with the train going through). I liked this idea of bringing two forms of time together. 

 I also looked at the work of idres khan and the way he layers images on top of each other. For example he layered the many images of Hilla Bernd Bechers gas holders and created a static image which showed how the gas tank was still with everything around it which seemed to be like faint figures. Khan’s work explores the history of photography and literature, the beauty of repetition and the anxieties of authorship. “it’s obviously not about re-photographing the photographs to make exact copies, but to intervene and bring a spectrum of feelings – warmth, humour, anxiety – to what might otherwise be considered cool aloof image.  You can see the illusion of my hand in the layering.  It looks like a drawing.  It’s not systematic or uniform.  The opacity of every layer is a different fallible, human decision”


http://www.saatchi-gallery.co.uk/artists/artpages/idris_khan_becher_gas.htm


I am looking at photographing the clock in Southampton because I am going to capture to different times. It's very tall and stands out alone while there is refurbishment going on below it with scaffolding all over the place and also cars and pedestrians passing by all the time.
So this is my final image. I tried different things such as layering many images but this didn't work very well for me because the clock tower wasn't static when I layered all the photos.
I'm quite happy with the final image although when it came to printing, the image didn't come out full A3

Tuesday 22 November 2011

Image lab 3- Image Processes

Also in week five we spoke about work  by Taryn Simon and looked at prints with text at the side or underneath them for the Image lab 3 I was going to undertake.

My task was to either choose a photograph by a photographer, or work which I was going to produce in the workshop in week six, and put it onto Photoshop and create an image with text underneath talking about the type of print, size and context.
Here is an example of and Image process with text underneath http://tarynsimon.com/works_americanindex.php

I looked through some Aperture magazines to try and find some different prints. I found some very interesting information on prints such as Calotypes, salt paper prints and photolyphic engraving on paper in issues number 161 Specimens and Marvels, William Henry Fox Talbot.

During the Paris trip (week six) I stayed at home and continued with my work, there was a Cyanotype and Argyrotype workshop I signed up for. 

Cyanotype is a photographic printing process that gives a cyan-blue print. the process was popular in engineering circles in the Th century. the simple and low-costing process made it easy to produce large-scale copies of work, referred to as blueprints. Two chemicals are used in this process: Ammonium iron (III) citrate and Potassium ferricyanide.
http://www.alternativephotography.com/wp/processes/cyanotype/cyanotype-classic-process

Argyrotype is an iron-based silver printing process that produces brown images on plain paper. it is an alternative process derived from the Argentotype, Kallitype and Van Dyke processes of the 19Th century, but it has more simplicity, improved image stability and longer sensitizer shelf-life. 
The process may not perform in the way the other processes do, but it is much less costly and user friendly. It is a good first process to try. The sensitizer used is very slow, so printing must be by contact using a large format negative and ultra-violet light.
http://www.mikeware.demon.co.uk/argy.html

I had quite a few attempts with both Cyanotype and Argyrotype. I found that my favourite results came from the Argyrotype. So I decided to use one of the pinhole negative from the first thing we tried in Image Lab. I thought this would be interesting so that I could show progression and connection through this project. 

So in week seven, I decided to use the Argyrotype of my pinhole photo 
I scanned this image in on the flatbed scanners and attached it to the process template. After adding all of the text to the image and printing, I hung my work along with everyone else's in the Gallery.
I really enjoyed learning about the different prints as I looked at everyone else's work and I am going to take note of all of the different print processes that people have looked at and research some more on them.

After producing images in these ways I found a couple of interesting books- 

'Coming into Focus: A Step-by-step Guide to Alternative Photographic and Printing Processes' (by John Barnier), which has many different types of prints in and how they are made (chapter 16 page 209 is the process of Argyrotypes). The other book I found was titled 'Sun Prints' by Linda McCartney which contains different Cyanotypes.


Overall I feel this was a useful part of the course so far to understand and acknowledge for the future in the course and beyond. These techniques are all parts which will be added to my professional knowledge for the subject. I am going to look into these more and try some of them out.

The Narrative

In week five we discussed the 'narrative' and why we use it.
My thoughts on the narrative within photography are that I create a story and portray this within my photographs- I have to do this because I can show the way that I personally see the world beneath me. 


I feel that the narrative is quite a personal thing because we see everything completely differently from each other- we have different views/culture and ideas. We create pieces that show how we view it from our own experiences. 


Narrative is a structure that helps classify content and form. It can also be used to construct story, prose, poetry, music and painting.


We tend to show the narrative with a beginning, middle and ending structure because it's in the structure of a story- just like in fiction/ non fiction books.


The photographer Weegee took various photos of crime scenes about New York, moving objects around to set up the composition and create a more satisfying aesthetic. This does make me think about whether the narrative can be portrayed as a true account or a perceived recollection. I found out about this here http://www.amber-online.com/exhibitions/weegee-collection/detail

The visual narrative is also transformed when using text just as Sophie Calle did. She manipulated her photos by adding words to the image, making the viewers wonder what reference the text has to the image and if it does at all.

Having text with an image can do one of two things- it could make relation to the image and repeat the story or, disfigure the observation of what the piece of work actually is.


But narrative construction can take form in many different ways- it doesn't have to be a set beginning, middle and end. If there are hints of content and form in an image, it can be considered to have a narrative.


I came across a book called Basics Creative Photography 02: Context and Narrative by Maria Short. This book clearly informs how photographers bring in the narrative and how they can make it relate to their work. 

Tuesday 15 November 2011

Image lab 2- Digital Scan


Also in week three I had to create a photo using Flat bed scanners, editing with Photoshop and showing a narrative to the image. I brought in objects and stuff I had found to scan just to play about with the scanners. 
I also learnt about the RGB and CMYK colour spaces. Here's a link! http://blurb.custhelp.com/app/answers/detail/a_id/448/related/1/session/L2F2LzEvdGltZS8xMzIxMzU2NDkwL3NpZC9fZ0RQZGFKaw%3D%3D
So I knew how to use the flat bed scanner and I had ideas of what I wanted to do. I worked with friends,  scanning lots of stuff to edit.
In week four I then went on to produe my final image. I had to show a kind of background/ narrative to my work. I decided to go for a personal approach to this; I used a Tigers eye Pendulum and use different media such as pencils, paint and glitter to create a circular movement on paper.  I scanned the image in and tried out different techniques such as inverting, using artistic paint brushes on Photoshop and saved each of them to later decide which one was strongest and fit best to the description.
I went with the photo on the at the bottom because It was just simple and said everything I wanted it to say- I wanted to show part of me and how I feel in life like my world just keeps going round and never stops while I'm right in the centre waiting for whatever life's going to throw at me. 
The tigers eye pendulum is something that means a lot to me as it's a spiritual healing object.
I then printed an A3 copy off on the printer-  amazing quality printers! I then Hung my print up in the gallery and a few of us came along ad spoke to Stephen and Kristianne about our work.      
 Overall this was a very good experience- I enjoyed taking my photography to a new level by using a scanner as a camera because it is helping to develop my style of photography and what technology I want to work with. 
This page is a link to one of the scanographers I quite like http://scannography.org/artists/Lopes-Hercilia.html 
There are also some others on there too!                                                                          

Monday 14 November 2011

Discussion on Gilbert and George

Week three-
We started the session by discussing and thinking about the work of Gilbert and George. This was very fascinating to me because I had never seen their work before or even familiar with them.


They create all of their work within walking distance of their own home in the east-end of London.
Their work is enormously diverse because of how they present the final work in this grid-style, and highlighting significant aspects of the very large images. There are other photographers who work in a grid style such as Hilla and Bernd Becher- they create works which have types of industrial structures with complex shapes.
http://www.tate.org.uk/research/tateresearch/tatepapers/04spring/stimson_paper.htm

My personal opinion on Gilbert and George is incredibly mixed- I don’t particularly like their use of bold, block colour and the cartoon-like image, yet I quite the fact that their deep issues are well hidden underneath it all. I also prefer the artists compared to their work, I find them a lot more interesting because they don’t give much away about their influences, and why they create the work they do.
(Left- red morning trouble 1977, right- bombers 2006)


More info on Gilbert and George:
http://www.tate.org.uk/modern/exhibitions/gilbertandgeorge/ 
I also found a book by Robin Dutt titled 'Gilbert and George (Obsessions and Compulsions). The introduction of this book says a few opinionated words on the pair that I agree with (especially the part where he says that their lives are an extension of their work!)

Image lab 1- Pinhole Photography

Week one-
I was introduced to Justin Quinell- I like the way he experiments constantly to try and get the perfect image- He has an intention but never knows what the outcome is going to be from the moment he begins.


(slow light)                                     (black and white)


This was my first experience with pinhole photography and a very interesting skill too! I like how I have learnt that I don’t necessarily need a camera to take photographs.


(Above: 12 second exposure in shaded area. Below: 6-day exposure in my back garden)


I first tried short exposures (of around 6-12 seconds) in sunlight and shaded areas. I then loaded up a long duration camera by sealing up the lid of my beer can with gaffer tape to stop it from coming off or water getting inside (of course the moisture could get inside the pinhole though I feel this can make a more natural/unexpected look). 


Week two-
This week we were carrying on with our pinhole work. I had my processed images and over the week worked into them further. I then exhibited my work in the gallery. 
I set up the long duration camera on a concrete post in my garden facing up towards the sun. I was worried it wouldn’t come out very well as there wasn’t a lot of sunlight and it did rain.
When I finished the exposure I had to take the photo paper out and put it straight in the scanner- this will automatically process the image.

I feel the exposure worked very well for a first time try as you can see the image quite clearly. I have now set up a 2-month exposure to take it further and below are the results of that (you can see a little bit of smoke from me smoking out of my window for the past two months) 


Overall my experience with this was very fascinating. I am going to try to link this work into some of the other things I will be doing in the coming weeks.


More of Justin's work:
http://www.pinholephotography.org/


There are other photographers who work with pinhole cameras too!
http://www.steveirvine.com/pinhole/